LiveChat
  Support
What Is a Docker Image? A Clear Guide to Containers’ Blueprints
If you have spent any time around modern software deployment, you have heard the word “image” thrown around constantly. A teammate says “pull the latest image,” your CI pipeline “builds an image,” and production “runs the image.” But what is a Docker image, actually? Underneath the jargon, the concept is simpler than it sounds — and once it clicks, the entire container ecosystem starts to make sense.
A Docker image is a read-only template, or blueprint, used to create containers. It is a packaged, frozen snapshot of a filesystem plus the metadata needed to run an application: the operating system libraries, your application code, runtime dependencies, environment variables, and the default command to execute. Think of it as a self-contained, portable recipe for a running program. Nothing in the image changes when you run it; instead, Docker uses the image as a starting point and spins up a live, writable container from it.
Key Takeaways
• A Docker image is a read-only, layered template that bundles an application with everything it needs to run.
• An image is the blueprint; a container is a running instance created from that blueprint — like a class versus an object.
• Images are built from a Dockerfile, stored in registries like Docker Hub, and identified by tags (e.g. `nginx:1.25`).
• Images are immutable and layered, which is the technical reason the same image runs identically on a laptop, a CI server, and production.
• You manage images with commands like `docker pull`, `docker build`, `docker images`, and `docker rmi` (to remove them).
What exactly is inside a Docker image?
A Docker image is not a single monolithic file. It is composed of a stack of layers, each representing a set of filesystem changes, combined with a manifest of metadata. When you peel it apart, an image contains two essential things:
- A filesystem snapshot. This is the collection of files and directories — the base OS userland (such as a slim Debian or Alpine root filesystem), installed packages, your compiled binaries or scripts, and configuration files. Everything the application needs to find on disk at runtime is captured here.
- Configuration metadata. This tells Docker *how* to run the image: which command to execute by default (`ENTRYPOINT` / `CMD`), which ports the app expects to expose, what environment variables to set, the working directory, and the user to run as.
Crucially, the filesystem snapshot is read-only. You cannot modify an image while it sits in your registry or on disk. This immutability is not an inconvenience — it is the feature that makes containers reliable, which we will return to shortly.
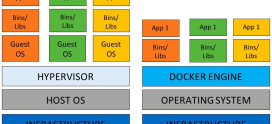
What is the difference between a Docker image and a container?
This is the single most common point of confusion for newcomers, so it deserves a precise answer. The relationship between an image and a container mirrors the relationship between a class and an object in programming, or a blueprint and a building.
The image is the static definition. The container is the live, running instance created from that definition. You can launch many containers from one image, each isolated from the others, each with its own writable layer on top of the shared read-only image layers. Stop and delete a container and the image remains untouched, ready to spawn more.
Here is the distinction at a glance:
| Aspect | Docker Image | Docker Container |
|---|---|---|
| Nature | Static blueprint / template | Running instance |
| State | Read-only, immutable | Writable, has runtime state |
| Analogy | Class, recipe, blueprint | Object, dish, building |
| Lifecycle | Built once, stored, reused | Created, started, stopped, deleted |
| Quantity | One image | Many containers from one image |
| Storage | Stacked read-only layers | Thin writable layer on top of image |
| Command to create | `docker build` / `docker pull` | `docker run` |
So when someone asks about docker image vs container, the short version is: the image is what you ship and store; the container is what actually runs. You build and distribute images, then run containers from them.
How do image layers and the union filesystem work?
Layers are where Docker’s design becomes genuinely clever. Each instruction in your build that changes the filesystem creates a new layer — a diff that records only what changed relative to the layer beneath it. Install a package? That is a layer. Copy in your app code? Another layer. Set an environment variable? Metadata, not a filesystem layer, but the principle holds.
Docker stacks these layers and presents them as a single, unified filesystem using a union filesystem (commonly OverlayFS on modern Linux). From inside the container, the application sees one normal directory tree. Under the hood, Docker is overlaying multiple read-only layers and topping them with one thin writable layer that belongs to the container.
This layering delivers two enormous benefits:
- Caching and reuse. If ten images all start `FROM debian:12`, that base layer is stored on disk once and shared across all of them. During builds, unchanged layers are pulled from cache, so rebuilding after a small code change takes seconds, not minutes.
- Efficient distribution. When you pull an updated image, Docker only downloads the layers you do not already have. Push a new version of your app and the registry transfers only the changed layer.
Here is the part most tutorials gloss over. A Docker image’s real superpower is the combination of two properties: it is immutable and it is layered. Because an image never changes after it is built, and because every machine reconstructs the exact same stack of cached layers, the *same image runs identically* on your laptop, on the CI server, and in production. You are not shipping just your code — you are shipping the entire environment, dependencies and OS libraries and all, frozen in amber. This is what actually kills the eternal “but it works on my machine” excuse. The environment is no longer a variable; it travels inside the image. Two engineers running `myapp:1.4.2` are running byte-for-byte the same filesystem, full stop.
How do you build an image from a Dockerfile?
You do not craft images by hand. You write a Dockerfile — a plain text script of instructions — and Docker executes it to produce the image. Each instruction typically becomes a layer.
A minimal Dockerfile for a Node.js app might look like this:
“`dockerfile
FROM node:20-alpine
WORKDIR /app
COPY package*.json ./ RUN npm ci –omit=dev
COPY . .
EXPOSE 3000 CMD [“node”, “server.js”] “`
You turn this Dockerfile into an image with `docker build`, tagging it with a name and version:
“`bash docker build -t myapp:1.0 . “`
The trailing `.` is the build context — the directory whose files Docker can copy into the image. Notice the deliberate ordering: dependencies are copied and installed *before* the application code. Because that layer rarely changes, Docker reuses it from cache on subsequent builds, and only the final `COPY . .` layer is rebuilt when you edit your code. Ordering your Dockerfile from least-frequently-changed to most-frequently-changed is one of the highest-leverage optimizations you can make.
If you want a deeper view of how containers fit into modern infrastructure, this article is part of our strategic guide to cloud hosting and containers, which connects images, orchestration, and deployment into one picture.
Where are Docker images stored — and what are registries?
Once built, images live in registries — centralized repositories for storing and distributing images. Docker Hub is the default public registry, hosting official images for nearly every common piece of software (databases, web servers, language runtimes). Organizations also run private registries such as Amazon ECR, Google Artifact Registry, GitHub Container Registry, or a self-hosted registry on their own servers.
The two core registry operations are pull and push:
“`bash
docker pull nginx:1.25
docker push myregistry.com/myapp:1.0 “`
When you run `docker run nginx` without having the image locally, Docker automatically pulls it first. This pull-on-demand behavior is why you can deploy a containerized app to a fresh server with a single command — the server fetches the image, layer by layer, and starts running it.
What are the essential Docker image commands?
Day-to-day, you will lean on a small set of commands. Here are the ones worth memorizing:
| Command | What it does |
|---|---|
| `docker images` | List all images stored locally |
| `docker pull |
Download an image from a registry |
| `docker build -t name:tag .` | Build an image from a Dockerfile |
| `docker run |
Create and start a container from an image |
| `docker tag |
Add a new tag to an existing image |
| `docker rmi |
Remove an image |
| `docker image prune` | Remove dangling (unused) images |
A quick example of the typical loop:
“`bash
docker images
docker pull redis:7 docker run -d –name cache redis:7 “`
How do you remove Docker images? (docker rmi, docker rm images, remove all images)
Images accumulate fast — every build, every pulled base image, every old version eats disk space. Cleaning them up is a routine task, and it trips people up because of one naming subtlety: there is no `docker rm images` command. `docker rm` removes *containers*, while `docker rmi` (image remove) is the command for images. If you searched for “docker rm images,” what you almost certainly want is `docker rmi`.
To remove a single image by name or ID:
“`bash docker rmi nginx:1.25 “`
If a running or stopped container depends on the image, Docker will refuse and ask you to remove the container first (or force it with `-f`, used with care):
“`bash docker rmi -f nginx:1.25 “`
To remove all images — the common “docker remove all images” request — you feed the list of image IDs into `docker rmi`:
“`bash docker rmi $(docker images -q) “`
Here `docker images -q` outputs only the image IDs (quiet mode), and the `$(…)` passes them as arguments to `docker rmi`. To force-remove everything, including images backing containers:
“`bash docker rmi -f $(docker images -q) “`
A gentler, more common housekeeping move is pruning only the dangling images — untagged leftovers from rebuilds — or all unused images:
“`bash
docker image prune
docker image prune -a “`
For most teams, scheduled `docker image prune -a` is the right cleanup tool; reach for `docker rmi $(docker images -q)` only when you genuinely want a clean slate.
How do tags and versions work?
A tag is a human-readable label attached to an image, written as `repository:tag` — for example `nginx:1.25` or `myapp:1.0`. Tags let you maintain multiple versions of the same image side by side. If you omit the tag, Docker assumes `latest`, which is simply a default label, *not* a guarantee of the newest version.
“`bash
docker pull postgres:15 docker pull postgres:16
docker tag myapp:1.0 myregistry.com/myapp:1.0 “`
A word of hard-won advice: avoid relying on `latest` in production. Because `latest` is a moving target, pinning a specific version tag (or better, an immutable digest like `myapp@sha256:…`) guarantees you deploy exactly the image you tested. Vague tags are a frequent source of “it worked yesterday” incidents.
How big are Docker images, and how do you keep them small?
Image size matters: smaller images pull faster, deploy quicker, present a smaller attack surface, and cost less to store. A naive image can balloon to over a gigabyte; a well-built one might be tens of megabytes. The biggest levers:
- Choose a slim base image. `alpine` or `-slim` variants are dramatically smaller than full distributions.
- Use multi-stage builds. Compile or bundle in one stage, then copy only the finished artifacts into a clean final stage — leaving build tools behind.
- Minimize layers and clean up within them. Combine related `RUN` commands and remove caches in the same layer so the cleanup actually shrinks the image.
- Use a `.dockerignore` file. Keep `node_modules`, `.git`, and local junk out of the build context.
A multi-stage build looks like this:
“`dockerfile
FROM node:20 AS build WORKDIR /app COPY . . RUN npm ci && npm run build
FROM node:20-alpine WORKDIR /app COPY –from=build /app/dist ./dist COPY –from=build /app/node_modules ./node_modules CMD [“node”, “dist/server.js”] “`
The final image carries only the runtime essentials, not the full toolchain — often cutting size by half or more.
Running your own containerized apps with DarazHost. Understanding images is one thing; you also need somewhere to build, store, and run them on guaranteed resources. DarazHost VPS and dedicated servers give you full root access, so you can install Docker, pull base images, build your own images, and run containers exactly as your workflow demands — without shared-hosting restrictions. You get dedicated, guaranteed CPU and memory, transparent pricing with no surprise overage bills, and 24/7 technical support if something needs a second pair of hands. Whether you are running a single container or orchestrating several, you keep full control of your environment from build to deploy.
Frequently asked questions
Is a Docker image the same as a virtual machine image? No. A VM image contains an entire guest operating system with its own kernel, while a Docker image contains only the application and its userland dependencies — it shares the host’s kernel. That is why Docker images are far smaller and start in seconds rather than minutes.
Can I edit a Docker image directly? Not in place — images are immutable and read-only. To change an image, you modify its Dockerfile (or run a container, make changes, and `docker commit`, though editing the Dockerfile is the correct, repeatable approach) and build a new image. The old image is unchanged.
What is the difference between `docker rm` and `docker rmi`? `docker rm` removes containers; `docker rmi` removes images. There is no `docker rm images` command — if you want to delete images, use `docker rmi`, or `docker image prune` for unused ones.
Why does my image use the `latest` tag when I did not specify one? `latest` is Docker’s default tag applied when you omit one. It does not mean “newest version” — it is just a label. For predictable deployments, always pin an explicit version tag.
How do images relate to Kubernetes and orchestration? Images are the unit Kubernetes schedules and runs across a cluster. Kubernetes pulls your image from a registry and runs containers from it on whatever nodes have capacity.