LiveChat
  Support
WHMCS Setup: A Methodical Step-by-Step Guide for Your Hosting Business
If you run a hosting or reseller business, the software you choose to manage clients, billing, and account creation decides whether you spend your days collecting payments by hand or letting a system do it for you. WHMCS setup is the foundation of that decision. Done methodically, it turns a pile of manual chores, signups, invoices, payment chasing, account creation, and support, into a quiet, automated engine. Done carelessly, it becomes a half-working tool that frustrates you and your customers.
This guide builds from the fundamentals up. First we define what WHMCS actually does, then we walk through each setup stage in order, and finally we cover the single step most beginners forget, the one that silently breaks everything.
Key Takeaways
• WHMCS is a client management, billing, and automation platform that runs the operational side of a hosting or reseller business.
• Setup proceeds in clear stages: requirements and install, general configuration, payment gateways, servers and products, automation, then branding, security, and going live.
• The System URL and email settings are configured early because nearly every other feature depends on them.
• Server modules let WHMCS auto-provision accounts on panels like cPanel/WHM, eliminating manual account creation.
• The cron job is the most-forgotten and most-critical step: without it, WHMCS stops invoicing and automating, silently.
What Does WHMCS Actually Do?
Before configuring anything, understand the role the software plays. WHMCS (Web Host Manager Complete Solution) is the business automation layer that sits between your customers and your servers. It is not the panel that creates hosting accounts, that is a control panel like cPanel/WHM, and it is not your web server. It is the system that ties everything together.
In practical terms, WHMCS handles:
- Signups and ordering through a client-facing order form and shopping cart.
- Billing and invoicing, generating invoices on a schedule and tracking what each client owes.
- Payment collection, charging cards or capturing payments through connected gateways.
- Account provisioning, talking to your server through a module to create, suspend, or terminate hosting accounts automatically.
- Support tickets and a unified client area where customers manage their services.
The key idea is *automation*. WHMCS exists so that a new order can flow from payment to a live, provisioned hosting account without you touching anything. Keep that goal in mind as you work through the stages, because every setting either supports that flow or interrupts it.
What Are the Stages of a WHMCS Setup?
A reliable installation follows a predictable order. Rushing or skipping ahead is where most problems begin. Here is the full sequence at a glance.
| Stage | What you do | Why it matters |
|---|---|---|
| 1. Requirements & install | Confirm PHP, MySQL, ionCube; get a license; run the installer | Nothing works without the right environment |
| 2. General configuration | Company details, currencies, System URL, email | Core settings nearly everything depends on |
| 3. Payment gateways | Connect a payment processor | You cannot bill clients without this |
| 4. Servers & products | Add servers, configure modules, build plans | Enables auto-provisioning and a real catalog |
| 5. Automation (cron) | Schedule the WHMCS cron task | Runs invoicing, reminders, suspensions |
| 6. Branding, security, go live | Theme, 2FA, secure admin folder | Polish, protection, and launch |
Work through them in order. Each stage assumes the previous one is complete.
Stage 1: Requirements and Installation
WHMCS runs on a standard web stack, but it has specific dependencies. You need a hosting account or server providing PHP, MySQL (or MariaDB), and the ionCube Loader, which is required because WHMCS ships partially encoded. You also need a valid WHMCS license, the software is commercial, not free.
The mechanical steps are straightforward:
- Confirm your server meets the current PHP and MySQL version requirements and that ionCube is enabled.
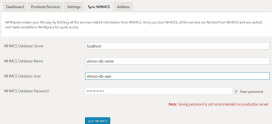
- Create an empty MySQL database and a database user with full privileges on it.
- Download the WHMCS installation files and upload them to your hosting account.
- Run the installer in your browser, enter your license key and database details, and create your first admin account.
- Remove the install directory afterward, as the installer instructs, so it cannot be re-run.
If ionCube is missing or the PHP version is wrong, the installer simply will not proceed. Resolving the environment first saves you from troubleshooting blind.
Stage 2: General Configuration
With WHMCS installed, log into the admin area and open the General Settings. This stage establishes the identity and baseline behavior of your installation.
Configure your company name, address, and logo, your default currency (and any additional currencies if you bill internationally), and your tax rules if they apply. Two settings deserve special care:
- The System URL. This is the canonical web address WHMCS uses for links in emails, return URLs from payment gateways, and internal redirects. If it is wrong, payment callbacks and client links break in confusing ways. Set it correctly and consistently, including whether you use `https` and `www`.
- Email settings. WHMCS sends invoices, welcome messages, and reminders by email. Configure a reliable mail method (SMTP through an authenticated mail service is generally the most deliverable) and verify a test message actually arrives.
These early settings are foundational because almost every later feature, gateways, automation, the client area, references them.
Stage 3: Payment Gateways
A billing platform that cannot take money is just a spreadsheet. Payment gateways are the modules that connect WHMCS to a payment processor so invoices can be paid.
Open the payment gateway section, activate the gateway your processor provides, and enter the credentials (API keys or merchant details) it gives you. Decide which gateways appear to clients and set a sensible default. A practical approach is to start with one well-supported gateway, confirm a real test transaction completes end to end, then add alternatives. Always verify that the payment callback returns to your System URL correctly, this is where a misconfigured URL from Stage 2 reveals itself.
Stage 4: Servers and Products
Now connect WHMCS to the infrastructure that actually delivers hosting, and build the catalog clients buy from.
Adding a server. Under the servers configuration, add each server WHMCS will manage. You provide its hostname, the server module to use, and access credentials (typically an API token or access hash rather than a raw password). The module is what lets WHMCS speak to the panel: a cPanel/WHM module lets WHMCS create and manage cPanel accounts, and WHMCS can integrate with other provisioning panels through their own modules in the same pattern, including server panels used for specialized workloads. The principle is consistent: the module translates WHMCS actions into panel commands.
Creating products. With a server connected, build the products and plans clients order, shared hosting tiers, reseller packages, and so on. For each product, set the pricing, the billing cycle, and crucially link it to the server group and module so that ordering the product triggers automatic provisioning. When configured correctly, a paid order creates the hosting account with no manual step.
Stage 5: Automation, the Cron Job
This is the stage to slow down on, because it is the one that quietly determines whether your whole installation works.
WHMCS performs its recurring work, generating invoices, sending payment reminders, suspending and terminating overdue accounts, retrying card charges, and processing queued provisioning tasks, through a scheduled task called the cron job. The cron is not optional and it is not a background daemon WHMCS runs on its own. It is a system-level scheduled command that must call the WHMCS cron script on a regular interval, typically once every few minutes for the queue and once daily for the main billing run.
To set it up, add a cron job on your server (through cPanel’s cron interface or the server’s crontab) that runs the PHP cron script inside your WHMCS `crons` directory on the schedule WHMCS documents. Then confirm in the admin area’s automation status that the cron is reporting as run recently.
Here is the single most-forgotten step that breaks a new WHMCS install: the cron job. WHMCS relies entirely on this scheduled task to run its automation. Skip it or misconfigure the path, and WHMCS does not warn you loudly, it simply stops generating invoices, stops sending reminders, and stops suspending overdue accounts. You will sit there wondering why nothing is happening while your “automated” business does nothing at all. Set the cron up correctly *during* setup, not as an afterthought, and verify it actually runs. A WHMCS install without a working cron is a billing system that does not bill.
Stage 6: Client Area, Branding, Security, and Going Live
With the engine running, finish the experience and lock it down.
- Branding. Apply your theme, logo, and colors to the client area so it matches your business and feels trustworthy at checkout.
- Security. Enable two-factor authentication (2FA) for admin accounts, rename the admin folder from its default to a non-obvious name, restrict access where possible, and keep WHMCS updated. Treat admin access as you would the keys to your bank.
- Go live. Run a full test order, payment, provisioning, welcome email, as if you were a customer, then open the doors.
Run WHMCS on Infrastructure Built for It
A billing platform is only as dependable as the server under it. DarazHost hosting provides the environment WHMCS needs to run cleanly, PHP, the ionCube Loader, and MySQL, plus a properly running cron so your automation, invoicing, reminders, and suspensions, actually fires on schedule. That last point matters: many WHMCS problems trace back to a cron that never ran, and we make sure yours does.
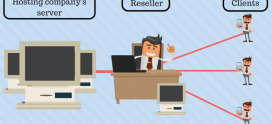
For those building a hosting business, pair WHMCS with DarazHost Reseller Hosting, where WHMCS automation provisions accounts on white-label hosting you sell under your own brand. The result is a clean loop: a client orders, WHMCS bills and provisions, and the account goes live, no manual work. With reliable, fast infrastructure and 24/7 support to help you through your WHMCS setup, you can focus on growing the business instead of babysitting it.
How Long Does a WHMCS Setup Take?
A basic, working installation, install through a first live product, can be completed in an afternoon if your server already meets the requirements. The variable parts are gateway approval (your payment processor may need to verify your business) and fine-tuning products, emails, and branding. Budget a focused day for the core, then iterate.
FAQ
Do I need a separate server to run WHMCS? Not necessarily. WHMCS can run on a standard hosting account that provides PHP, MySQL, and ionCube. Many operators run WHMCS on one hosting account while it provisions client accounts on a separate hosting server through a server module. What matters is that the requirements are met and the cron can run.
Why is the cron job so important in WHMCS? Because all of WHMCS’s automation depends on it. The cron is the scheduled task that triggers invoicing, payment reminders, overdue suspensions, and queued provisioning. Without a correctly configured cron, WHMCS stops performing these actions, usually with no obvious alarm, so always set it up and verify it during installation.
Can WHMCS automatically create hosting accounts? Yes. When you connect a server with the appropriate server module (such as a cPanel/WHM module) and link your products to it, a paid order can provision the hosting account automatically, no manual account creation required.
What is the System URL and why does it matter? The System URL is the canonical address WHMCS uses for email links and payment gateway return URLs. If it is incorrect, clients may follow broken links and payment callbacks can fail, so set it accurately early in general configuration.
Is WHMCS free? No. WHMCS is commercial software that requires a valid license. You install it on your own hosting, but you need a license key to run it, which you enter during the installer step.
Set up methodically, stage by stage, and confirm each stage before moving on, especially the cron, and WHMCS becomes the dependable backbone of a hosting or reseller business rather than a source of mystery problems.