LiveChat
  Support
WHMCS Login Page Setup: Make Your Site Just the Client Area
If you run a hosting or reseller business, your WHMCS client area is where customers log in, pay invoices, and open support tickets. A common goal is to make the site itself *just* be the WHMCS login page and client portal, with no extra marketing layer in the way. This guide walks through accessing the login page, customizing the landing experience, pointing your domain straight at the client area, and locking it down with modern security.
Key Takeaways
• WHMCS is billing and automation software for hosting providers; the client area is the customer-facing login and account portal.
• You can make your domain root load the WHMCS login page directly by adjusting the installation path or adding a root redirect.
• The login page is customizable through template settings, custom CSS, and a chosen client area theme.
• A custom client area URL (for example, `clients.yourdomain.com`) keeps billing tidy and brandable.
• Enable two-factor authentication (2FA) and reCAPTCHA to protect logins from brute-force attempts.
What Is WHMCS and What Is the Client Area?
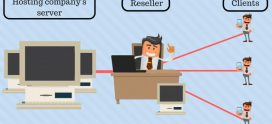
WHMCS (Web Host Manager Complete Solution) is an all-in-one billing and automation platform built for hosting and domain businesses. It handles invoicing, payment collection, account provisioning, domain registration, and support tickets from a single dashboard. When a customer buys a hosting plan, WHMCS can automatically create the cPanel account, send the welcome email, and bill the renewal, all without manual work.
The client area is the part your customers actually see. It is the logged-in portal where they:
- View and pay invoices
- Manage services (hosting, domains, SSL)
- Open and track support tickets
- Update billing and contact details
The login page is the front door to that client area. When someone wants their “site to just be WHMCS,” they usually mean they want visitors to land on this login or client portal instead of a separate brochure website.
How Do You Access the WHMCS Client Login Page?
By default, WHMCS installs into a subdirectory or subdomain, and the login page lives at a predictable URL. The exact address depends on where you installed the software.
| Installation setup | Typical login URL |
|---|---|
| Subdirectory install | `https://yourdomain.com/whmcs/` |
| Renamed directory | `https://yourdomain.com/clients/` |
| Subdomain install | `https://clients.yourdomain.com/` |
| Billing subdomain | `https://billing.yourdomain.com/` |
The client area landing page (`index.php`) shows the login form alongside any configured homepage panels. The dedicated login form itself is reachable at the client area path with `clientarea.php`. If you are unsure of your path, check the System Settings → General Settings → Domain field inside the WHMCS admin, which stores the canonical client area URL.
How Do You Make Your Site *Just* the WHMCS Client Area?
This is the core of the “login page just site whmcs” goal: you want the bare domain (`https://yourdomain.com`) to load the client portal, not a separate website. There are three reliable approaches.
Option 1: Install WHMCS at the Domain Root
If you have no separate marketing site, install WHMCS directly in your web root (`public_html`) so the client area *is* the homepage. The login page then loads at `https://yourdomain.com/` with no subfolder. This is the cleanest result but assumes the whole domain is dedicated to the portal.
Option 2: Redirect the Root to the Client Area
If WHMCS lives in a subfolder, add a redirect so the root forwards to it. A simple `.htaccess` rule on an Apache server does the job:
“`apache RewriteEngine On RewriteRule ^$ /clients/ [L,R=301] “`
This sends anyone visiting the bare domain straight to the client area login. Adjust `/clients/` to match your install path.
Option 3: Set the Client Area URL and Point a Subdomain
Create a subdomain such as `clients.yourdomain.com`, point it at the WHMCS directory, and set that address as the canonical client area URL in General Settings. Visitors then reach a branded, dedicated portal address.
A subtle but important detail: WHMCS uses the configured client area URL to build links in automated emails, password resets, and payment callbacks. If you redirect the root or change the path without updating the stored URL in General Settings, customers can receive emails pointing to the *old* address, and payment gateway return URLs may break. Always update the canonical URL first, then add cosmetic redirects on top.
How Do You Customize the WHMCS Login and Landing Page?
Once the portal is reachable, you will want it to look like *your* brand rather than a default install.
Step-by-step customization:
- Choose a client area theme. In System Settings → General Settings → Ordering / Client Area, select an active client area template. The default modern theme is responsive and a good base.
- Set your logo. Upload a logo through the branding settings so it appears above the login form.
- Edit homepage panels. Toggle which panels (announcements, network status, knowledgebase shortcuts) show on the landing page so the login form stays front and center.
- Add custom CSS. Use a child template or custom stylesheet to recolor buttons, backgrounds, and the login card to match your brand palette.
- Customize language strings. Override headings and button text through language file overrides for a tailored tone.
- Configure the homepage URL. Decide whether the landing page or the direct login form is the entry point your redirects target.
For deeper changes, create a child theme so your edits survive WHMCS updates. Editing core template files directly means your work is overwritten on every upgrade, which is a common and avoidable mistake.
How Do You Theme the Login Page Specifically?
The login form is rendered by template files within your active client area theme. To restyle it without breaking updates:
- Duplicate the theme into a new folder and activate the copy.
- Target the login container with CSS classes to adjust width, shadow, and centering.
- Add a background image or gradient to the login wrapper for a portal-style landing.
- Hide unused panels so a visitor sees a focused login experience rather than a busy dashboard.
Keep contrast high and the form fields obvious. The login page is a trust moment; a clean, fast, branded page signals a professional operation.
How Do You Secure the WHMCS Login Page?
Because the client area holds billing and personal data, security is not optional. Harden the login page with layered controls.
- Two-factor authentication (2FA): Enable 2FA for both clients and admins. Time-based one-time passwords (TOTP) add a second factor beyond the password.
- reCAPTCHA on login: Turn on CAPTCHA for the login and password reset forms to block automated brute-force and credential-stuffing attempts.
- Force HTTPS: Serve the entire client area over SSL so credentials are never sent in plain text.
- Limit failed attempts: Configure login attempt limits so accounts lock after repeated failures.
- Keep WHMCS updated: Apply security patches promptly, since outdated installs are a frequent target.
- Protect the admin directory: Rename and IP-restrict the admin path so it is separate from the public client login.
A secure login page protects your reputation as much as your data. One breach erodes the customer trust a hosting brand depends on.
Running WHMCS for your hosting or reseller business? WHMCS only performs as well as the server beneath it. DarazHost provides fast, secure hosting built to run WHMCS smoothly, so your client area, billing automation, and login page stay online and responsive around the clock. For those starting or scaling a hosting brand, DarazHost Reseller Hosting pairs WHMCS automation with white-label hosting, letting you sell plans under your own name while we handle the infrastructure. With reliable uptime, secure architecture, and 24/7 support, DarazHost gives your client portal a dependable foundation.
What Are the Most Common WHMCS Login Page Issues?
Even a well-configured portal hits snags. Here are the frequent ones and their fixes.
- Blank or broken login page: Usually a template caching issue or a corrupted custom theme file. Clear the template cache and verify the active theme exists.
- Redirect loops: Caused by conflicting `.htaccess` rules and the canonical client area URL. Make sure both point to the same final address.
- Mixed-content warnings: Happen when the client area URL is set to `http://` but the site loads over `https://`. Update the stored URL to use HTTPS.
- Emails linking to the wrong URL: The stored client area URL is outdated. Correct it in General Settings.
- CAPTCHA not appearing: API keys are missing or misconfigured in the security settings.
Frequently Asked Questions
Can I make my domain root load the WHMCS login page directly? Yes. Either install WHMCS in your web root so the portal is the homepage, or add a root-level redirect (such as an `.htaccess` rule) that forwards the bare domain to your client area path. Update the canonical client area URL first so emails and payment callbacks stay correct.
What is the difference between the client area and the login page? The client area is the full logged-in portal where customers manage services, invoices, and tickets. The login page is the entry form that authenticates them into that portal. The landing page shows the login form plus any homepage panels you enable.
Can I customize the WHMCS login page without coding? Partly. You can change the logo, theme, panels, and language strings through admin settings with no code. Deeper visual changes, like restyling the login card, need custom CSS, ideally applied through a child theme so updates do not overwrite your work.
How do I set a custom client area URL like clients.mydomain.com? Create the subdomain, point it at your WHMCS directory, then enter that full address as the client area URL in System Settings → General Settings. Always set the canonical URL before adding redirects to avoid broken links.
Is two-factor authentication necessary for a small hosting portal? Yes. Even small portals hold billing and personal data, making them attractive targets. Enabling 2FA and reCAPTCHA dramatically reduces the risk of unauthorized logins for very little effort.